วิธีใช้งานHow it works
ใช้งาน TapStock ทุกขั้นตอนEvery TapStock flow, step by step
ตั้งค่าครั้งเดียวแล้วให้พนักงานบันทึกสต๊อกได้เองบนมือถือ — รับเข้า จ่ายออก ย้าย ปรับยอด จบในไม่กี่แตะSet it up once, then let staff record stock on their phones — receive, issue, transfer, adjust, all in a few taps.
01
เริ่มต้นใช้งานใน 3 ขั้นGet started in 3 steps
TapStock ออกแบบให้ตั้งค่าครั้งเดียวแล้วใช้ได้ทันที ไม่ต้องอบรมพนักงานSet up once and you're ready — no staff training required.
- 1เข้าสู่ระบบด้วย Google — คลิกเดียว ไม่ต้องสมัครใหม่ ไม่ต้องตั้งรหัสผ่านSign in with Google — one click, no new account, no password.
- 2เลือก Sheet — สร้างใหม่จาก template หรือเชื่อม Sheet ที่มีอยู่Pick a Sheet — create one from a template or connect an existing one.
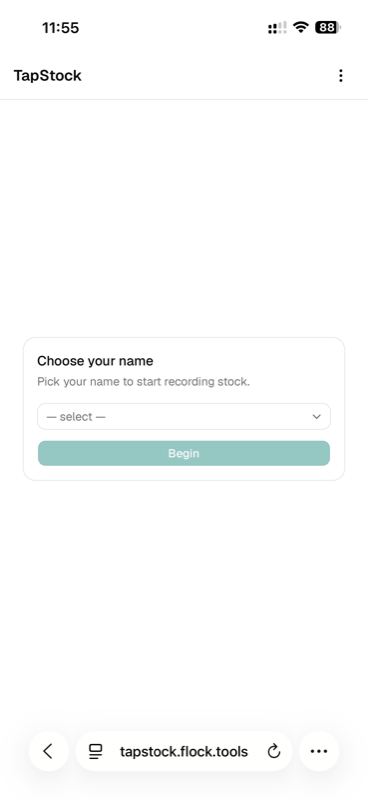
- 3พนักงานเลือกชื่อ — แตะแล้วเริ่มใช้ได้เลย ไม่ต้องล็อกอินรายคนStaff pick their name — tap and go, no per-person login.
02
🟢 รับเข้า (Receive)🟢 Receive
ใช้เมื่อมีของส่งเข้ามา — จากซัพพลายเออร์ จากการผลิต หรือกลับมาจากที่อื่นUse it when stock comes in — from a supplier, production, or returns.
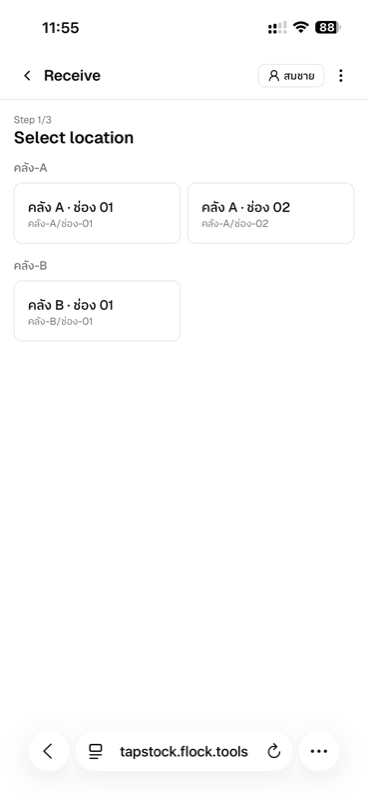
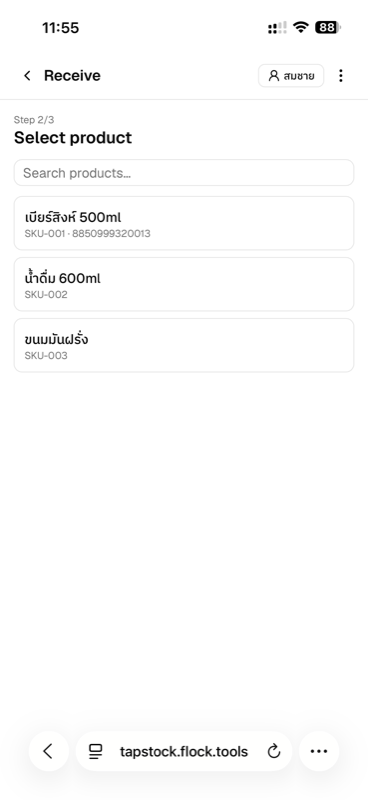
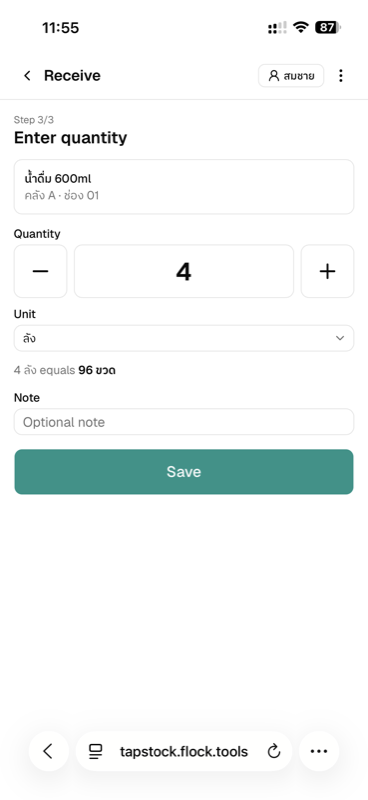
- 1แตะปุ่ม 🟢 Receive ที่หน้าหลักTap 🟢 Receive on the home screen
- 2เลือกคลัง/ช่องที่จะนำของเข้าPick the warehouse/bin to receive into
- 3เลือก SKU (พิมพ์ค้นหา หรือแตะจากรายการ)Pick the SKU (type to search or tap the list)
- 4ใส่จำนวน + เลือกหน่วย (ขวด/ลัง/กล่อง) แล้วกด SaveEnter quantity + unit (bottle/case/box) and Save
✅ ยอดสต๊อกอัปเดตทันที, transaction บันทึกพร้อมชื่อพนักงาน✅ The balance updates instantly and the transaction is logged with the operator's name.
03
🔴 จ่ายออก (Issue)🔴 Issue
ใช้เมื่อมีของออกจากคลัง — ขาย ใช้งาน ทิ้ง หรือคืน. ขั้นตอนเหมือน Receive: เลือกคลัง → เลือก SKU → ใส่จำนวน → SaveUse it when stock leaves — sold, used, discarded, or returned. Same flow as Receive: location → SKU → quantity → Save.
⚠️ ถ้าจ่ายออกเกินยอดในสต๊อก ระบบจะเตือนให้ยืนยันก่อน (ป้องกันพิมพ์ผิด)⚠️ Issuing more than the on-hand balance prompts a confirmation first (guards against typos).
04
🟠 ย้าย (Transfer)🟠 Transfer
ย้ายของจาก location หนึ่งไปอีกที่ — ไม่ต้องทำ 2 รายการ (จ่ายออก + รับเข้า)Move stock from one location to another — no need for two separate entries.
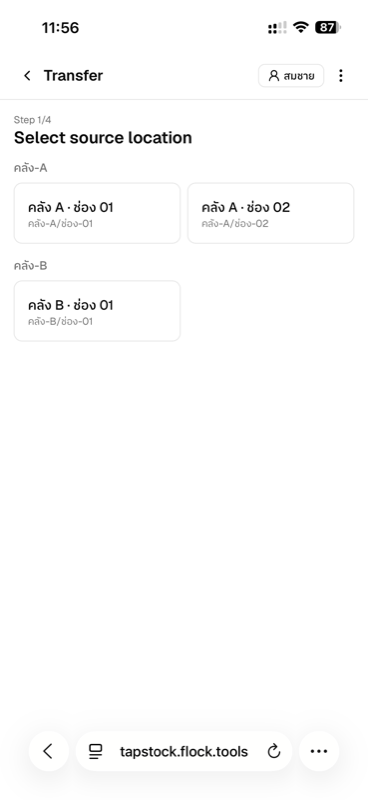
- 1แตะ 🟠 TransferTap 🟠 Transfer
- 2เลือกคลัง/ช่องต้นทาง (From)Pick the source warehouse/bin (From)
- 3เลือก SKU + ใส่จำนวนPick the SKU and enter the quantity
- 4เลือกคลัง/ช่องปลายทาง (To) แล้ว SavePick the destination (To) and Save
✅ ระบบลดยอดที่ต้นทาง + เพิ่มยอดที่ปลายทาง พร้อมเก็บ trail ทั้งคู่✅ It subtracts from the source and adds to the destination, keeping a trail on both sides.
05
🔵 ปรับยอด (Adjust)🔵 Adjust
ใช้เมื่อนับสต๊อกจริงแล้วไม่ตรงกับยอดในระบบ — ของเสีย ของหาย หรือนับใหม่Use it when a physical count doesn't match the system — damage, loss, or a recount.
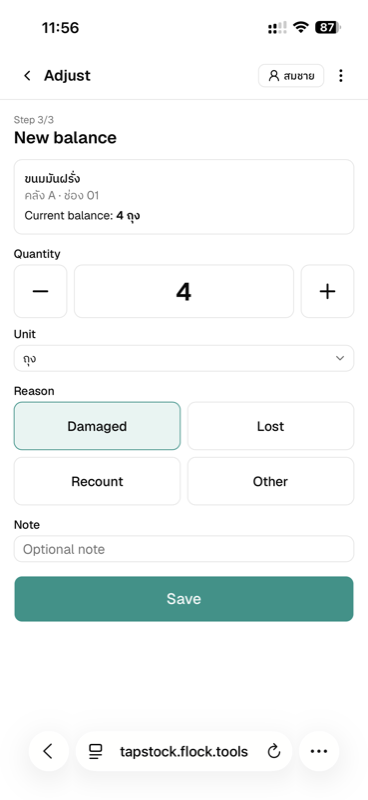
- 1แตะ 🔵 AdjustTap 🔵 Adjust
- 2เลือกคลัง/ช่อง + SKUPick the warehouse/bin and SKU
- 3ระบบแสดงยอดปัจจุบัน → ใส่ยอดที่ถูกต้องตามจริงIt shows the current balance → enter the real, correct count
- 4เลือกเหตุผล (เสีย/หาย/นับใหม่/อื่น ๆ) แล้ว SavePick a reason (damage/loss/recount/other) and Save
🔵 ต่างจาก Receive/Issue: Adjust = ตั้งยอดใหม่ทับเลย ไม่ใช่บวก/ลบ🔵 Unlike Receive/Issue, Adjust sets a new absolute balance rather than adding or subtracting.
06
📋 ดูยอดคงเหลือ (Stock balance)📋 Stock balance
ดูยอดของทุก SKU × ทุก location ในที่เดียว ค้นหาได้ทันทีSee every SKU × location balance in one place, searchable instantly.
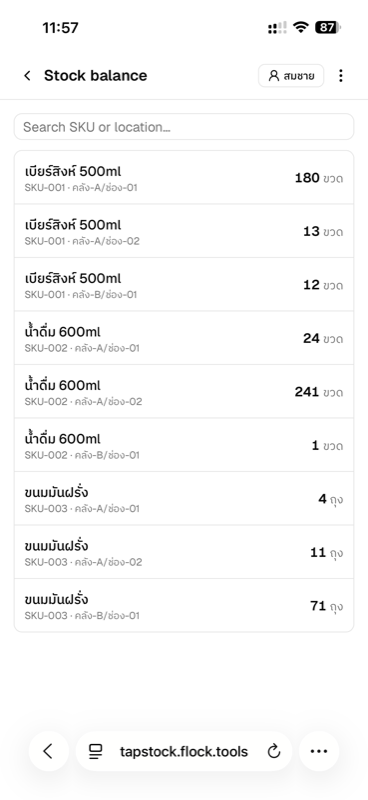
- 1แสดงทุก SKU × location ที่เคยมีของLists every SKU × location that has ever held stock
- 2ค้นหาตาม SKU ชื่อสินค้า หรือ locationSearch by SKU, product name, or location
- 3ยอดแสดงในหน่วยฐาน (base unit) ของแต่ละ SKUBalances shown in each SKU's base unit
07
📜 ดูประวัติ (Movement history)📜 Movement history
ดูทุก transaction ย้อนหลัง พร้อมตัวกรอง — ใครทำอะไร เมื่อไหร่ ที่ไหนBrowse every past transaction with filters — who did what, when, and where.
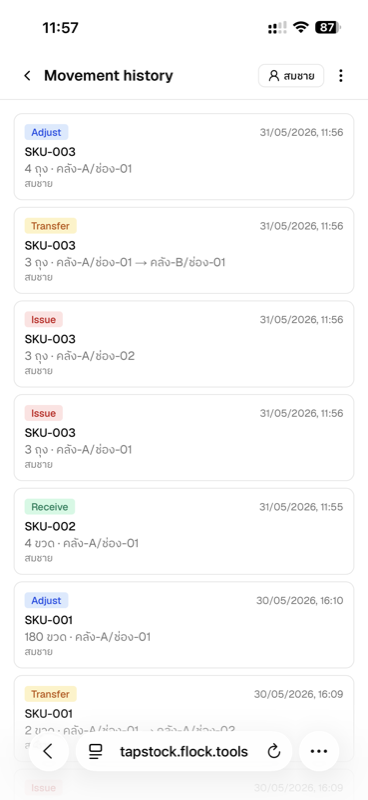
- 1🟢 Receive / 🔴 Issue / 🟠 Transfer / 🔵 Adjust แยกสีชัด🟢 Receive / 🔴 Issue / 🟠 Transfer / 🔵 Adjust, colour-coded
- 2SKU + จำนวน + หน่วยSKU + quantity + unit
- 3Location (Transfer แสดง from → to)Location (Transfer shows from → to)
- 4ชื่อพนักงาน + วันเวลาOperator name + timestamp
08
⚙️ ตั้งค่า Sheet (Connect)⚙️ Connect a Sheet
ดูว่าตอนนี้เชื่อมกับ Sheet ไหน สลับไปใช้ Sheet อื่น หรือสร้างใหม่See which Sheet you're connected to, switch to another, or create a new one.
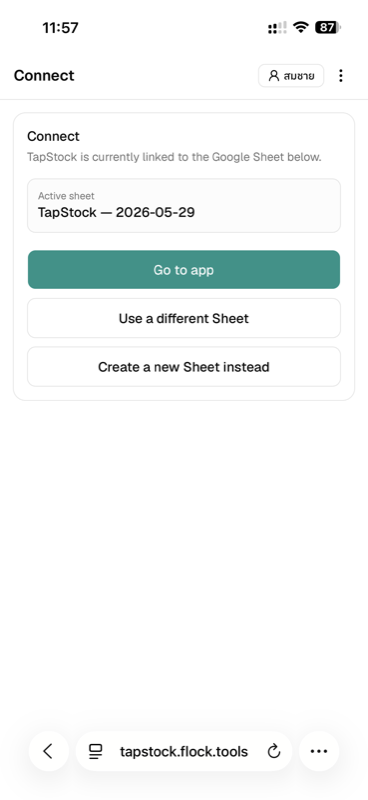
- 1Go to app — ใช้ Sheet เดิมต่อGo to app — keep using the current Sheet
- 2Use a different Sheet — เชื่อม Sheet ที่มีอยู่ของคุณ (paste link)Use a different Sheet — connect your own existing Sheet (paste the link)
- 3Create a new Sheet — ให้ระบบสร้าง Sheet จาก template ใหม่ใน DriveCreate a new Sheet — we drop a fresh template into your Drive
09
👤 เมนูผู้ใช้ (Account menu)👤 Account menu
แตะ ⋮ มุมขวาบนในแอป — รวมทุกอย่างเกี่ยวกับบัญชีTap ⋮ in the top-right of the app — everything about your account.
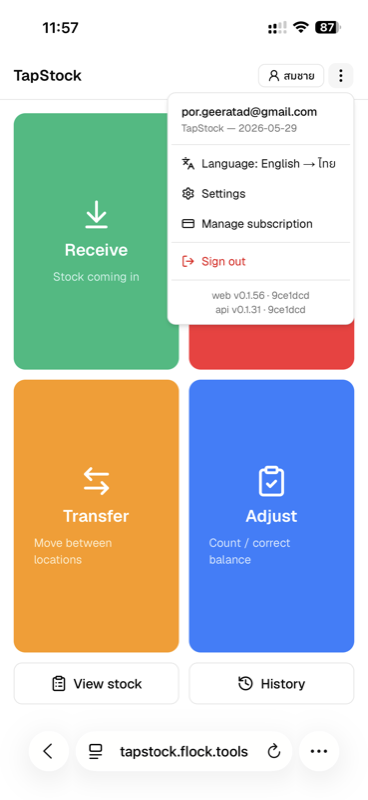
- 1ข้อมูลบัญชี + วันหมดอายุ trial / subscriptionAccount info + trial/subscription expiry
- 2Language — สลับ TH/ENLanguage — switch TH/EN
- 3Settings — กลับไปหน้า ConnectSettings — back to the Connect screen
- 4Manage subscription — จัดการการชำระเงิน ยกเลิก เปลี่ยนบัตรManage subscription — billing, cancel, change card
- 5Sign out — ออกจากระบบSign out
พร้อมลองเองหรือยัง?Ready to try it yourself?
ทดลองใช้ฟรี 14 วัน ตั้งค่าเสร็จใน 5 นาที14-day free trial. Setup in 5 minutes.
เริ่มทดลองใช้ฟรีStart free trial